
Looking to cut the cord and get our of Kabletown? If you’re looking to be a “cord-cutter” and ditch your cable or satellite bill, you’ve probably tried using Kodi and some add-ons like Genesis or SALTS to be able to watch whatever shows or movies you want, but what about local news and broadcast sports? What if want to be able to host a Superbowl party?
Well, you’re in luck. Kodi has the ability to control Live TV if you have a tuner and an antenna.

Video Demo
Here’s a quick video demo that shows off Live TV in Kodi as well as integration with Xbox One and Z-Wave Home Automation
There’s a bit of a setup process to getting Live TV PVR on Kodi, but once it’s all set up, it’s awesome! So, let’s get to it…
Buy a USB TV Tuner
This one is pretty much the one to get. This Hauppauge Digital TV Tuner not only works for a Windows home theater PC, but can also work plugged directly into an Xbox One.
[amazonjs asin=”B00XF7Z5DM” locale=”US” title=”Hauppauge Digital TV Tuner for Xbox One TV Tuners and Video Capture 1578″]
If you plug it into the Xbox One, then it would bypass your Kodi HTPC, so you would be missing out on all the other great stuff Kodi gives you. In my setup, my HTPC plugs into the HDMI In on my Xbox One, so I just say “Xbox Watch TV” and then I see Kodi on the screen.
Buy a Good Antenna
First of all, take note of how far away from your city’s TV station antennas you are. If you’re downtown or next to the mountain with the blinking red lights on it, you might be able to get away with a cheap antenna.
I still recommend going with a good quality antenna that is rated for long distances. I tried going the cheap route, and it never worked very well until my 4th antenna when finally I was able to get all the channels I wanted to watch. I got the ViewTV Flat HD Digital Indoor Amplified TV Antenna which has actually come down in price a lot!
[amazonjs asin=”B0158SZZOY” locale=”US” title=”ViewTV Flat HD Digital Indoor Amplified TV Antenna – 50 Miles Range – Detachable Amplifier Signal Booster – 12ft Coax Cable – Black”]
Antenna Placement
I have 2 of these. Since My house is on the north side of town, I have one for downstairs that’s stuck to a south-facing window, and the other upstairs which is on a door that is straight across from a south-facing window.
Install Argus TV PVR Back-end
There are many TV back-ends to choose from. You can check the compatibility list to choose one according to your operating system. But for this tutorial, I’ll show you how to use the Argus TV back-end on Windows because that’s what I use.
Head over to the Argus TV to download the latest stable version and install it. Technically, you can install it on any computer in your network and any Kodi running on the network can stream the video from the back-end over the network, but in my experience, it’s much better to install the back-end on the same computer as your primary Kodi HTPC. It’s much faster and doesn’t bog down your network.
Configure Argus TV Back-end
There are 2 main programs to open to configure various aspects of Argus TV back-end. They are “Recorder Console” and “Scheduler Console”. They have a very similar login screen. Since you are most likely opening this on the same computer as you installed it on, you will keep the server set to “localhost” and leave everything else default and click “Connect”

We’ll start in the Recorder Console since that handles the configuration of getting the actual channels and signals. Later, we’ll go into the Scheduler Console to setup the Electronic Programming Guide (EPG) or TV guide.
Here’s the menu of the Recorder Console.

Scan Channel Services
In Tuner Cards > Cards, make sure your USB TV tuner device is set as your tuner card and configured properly. Here is what mine looks like…

Next, go to Tuner Cards > Scan Services to scan through all the frequencies to see what channels are you able to pick up.

Setup Services and Channels
This part can be a bit confusing. Argus TV has the concepts of Services and Channels and they are different but very similar. A Service is the physical frequency that can be tuned on a specific Tuner Card to get a video signal. A Channel is a logical channel number and a name that is associated with a channel.
After you scan through all the channel frequencies, it should have added all the services to the Services page. Mine looks like this…

You will want to pick the stations that you want available and make it so only those services are linked to a channel.

Since we are using this with a Kodi front-end, be aware that at the time of writing this, the Kodi Live TV PVR front-end does not support sub-channels like 12.1 or 12-1, but it would only have channel 12. I hope they add sub-channel capabilities soon, but for now, just pick the best HD channel which is usually the x.1.
Test the Live TV Video Signal
Now, before we move on further, let’s test it to make sure that the channels are able to stream the video signal from the antenna.
For this, you will need to install VLC for Windows. Go to the Video LAN Organization website to download it and install it.
Open the Scheduler Console and go to Programs > Live TV/Radio, click on a channel, click “Start Live Stream”. You should see the live stream show up in the area below. Click on it and click “Open Stream”. The Live TV stream should open in VLC. So far so good!

Go ahead and close it and stop the stream, and let’s move on the next steps of getting the Guide Channels.
Guide Channels with Zap2XML
The next step is to import guide channels to associate channels with. A guide channel is only the meta data of what is playing at what times on that channel. It’s always changing as time passes so you will need to setup a method of fetching the latest data using a scheduled task.
Go to http://tvschedule.zap2it.com/ and register for a free account. There, you can set your favorite channels that you will want EPG data for, check to show in 6 hours grid, and check to only show favorites.
Now, go to http://zap2xml.awardspace.info/ and download and install Zap2XML for Windows.
Create a “zap2xml” folder in the XMLTV folder under ARGUS TV in the path shown below, and move the “zap2xml.exe” file into that new folder.

I’ve added a batch (.bat) file into that folder as well. Here’s what it does…
zap2xml.bat
This file is what executes the zap2xml.exe file via command line and uses command line parameters to pass your email address, password, and the location of the output file (which is xmltv.xml placed up a folder by use ../ in front of it). Here’s sample code for this file…
zap2xml.exe -u [email protected] -p yourpassword -o ../xmltv.xml
You could just double-click that .bat file and it will run the script to fetch EPG data from your Zap2It account, but instead, let’s setup a Windows Scheduled Task to execute it for you.
Scheduled Task to Fetch EPG
Search the Windows Start Menu for Task Scheduler and launch it.

Click “Create Task” and setup a Trigger to run daily at 2 AM or whatever time you would like it to run.

The set an Action to execute that batch script.

Once it’s all setup , select it and click “Run” in the right sidebar. You should see a command prompt open up and begin downloading EPG data. It can take a while depending on the number of favorite channels you specified in your Zap2It account, so be patient.
Once it’s done downloading, it will place a xmltv.xml in the XMLTV folder (up a level) for a very brief moment. Argus TV should immediate pick it up and move it to the “Processing” folder. This process can also take a very long time, so be patient with this too.
You can check on it’s status by opening the Argus TV Scheduler Console and going to Administration > View log. You should see something like this…

In my example, you see the “Importing…” log followed by a “Guide import finished…” log a few minutes later. Once you see that “finished” log, you should see the xml file move from the “Processing” folder to the “Imported” folder.
Now, open the Scheduler Console and go to Channel Administration > Channels. This is the page where you can set channels to visible, and associate them with a Guide Channel. With Zap2XML, the guide channels should have the channel number at the beginning so you should be able to map them fairly easily.

If yours is not showing up like this and you are only seeing the station call sign like “KTVKDT”, then you might want to Google search to find the Wikipedia page for terrestrial TV stations in your city. There you should find the station names for the channels you have.
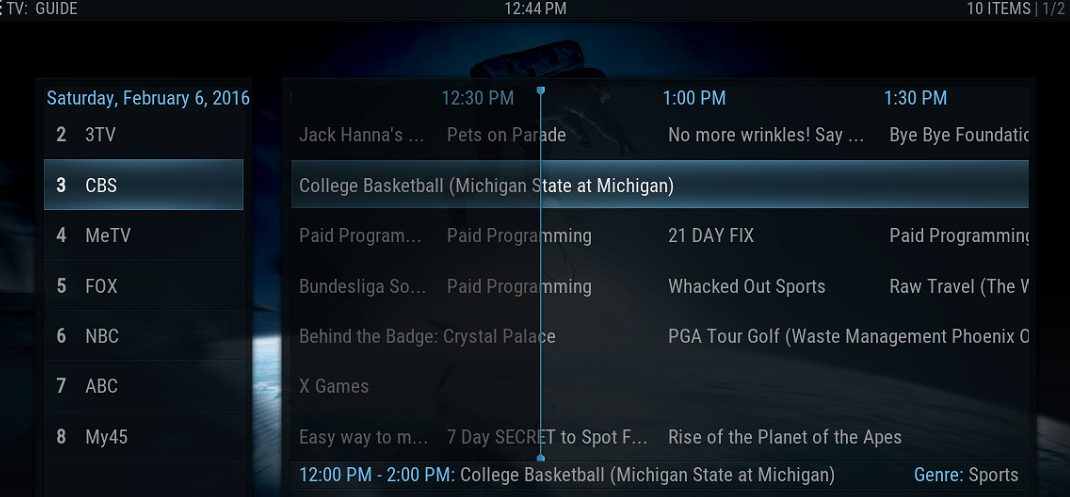
Once you’ve set all that up and saved it, go to Programs > Electronic Programming Guide, and you should see a TV guide display of the channels that you have setup.

Argus TV PVR addon for Kodi
Now for the easy part!
In Kodi, go to Settings > Add-ons > My Add-ons > PVR Clients, and enable the “ARGUS TV client” add-on. It should already be there, but if not, install it from the official Kodi repository.
Once you enable the Argus add-on, go into it to configure it. If you are running the front-end on a different computer from the back-end, you will need to enter the hostname and Windows credentials, but in my scenario I think we can leave all these settings alone.
Next, go to Settings > Live TV, and enable it.

There are more settings in there to play with, but it should work out of the box. Back out to the home screen and you should see a Live TV menu item.

Open that and you should see your channels with EPG data.

Tip, press the “e” key to go to Kodi’s Live TV Guide view!
Open a TV channel, and you should see Live TV streaming from your antenna, through the Argus TV back-end and into Kodi. Tip: press the tab key to toggle between this view and full screen.

Troubleshooting Kodi Live TV PVR
I know this is a very complicated setup process. I’ve spent many hours myself pulling my hair out when one thing or another wasn’t working as I expected. So, I understand if you’re going through the same thing.
If you are running into any issues, please let me and other know in the comments and we’ll try to help troubleshoot with you.
Also, if you see that I’ve left a step out or have a suggested improvement to the tutorial, please let me know so we can help other people out. Thanks!


[…] Looking to cut the cord and get our of Kabletown? If you’re looking to be a “cord-cutter” and ditch your cable or satellite bill, you’ve probably tried using Kodi and some add-ons like Genesis or SALTS to be able to watch whatever shows or movies Kinkead Tech […]
[…] to set it up, please visit this step by step tutorial I wrote a little while […]
[…] Tutorial: Kodi Live TV with EPG (TV Guide) […]
Is there an updated tutorial for integrating kodi or spmc with Xbox one and cortana? I have paid iptv services. I’d like to also point out that I’ve never attempted to do this before, haha. Thanks in advance
My only Xbox & Kodi integration is what I wrote about here… https://kinkeadtech.com/xbox-one-xbmc-kodi-live-tv-oneguide-integration/
But, I’m not sure if it’s what you’re looking for.
Is there a way you can do with an Android TV box itself? Do I have to have a tv tuner connected to it?
You do need a TV tuner for this tutorial. I don’t know of any PVR backend software that works on Android, so it will probably have to be on a separate computer. The Android box running Kodi can have the frontend PVR addon.
Thanks for that. I remember using simple IP pvr client.
LaToya, oh I see. There are IPTV add-ons for Kodi, but I’ve never gotten into them because they are just a list of m3u8 lists are riddled with bad links. It takes a long time to find what you want to watch, and have it playable, and in your own language. I can see going to that for sports, maybe. But besides that, for watching TV shows or movies, I’m all about using Exodus.