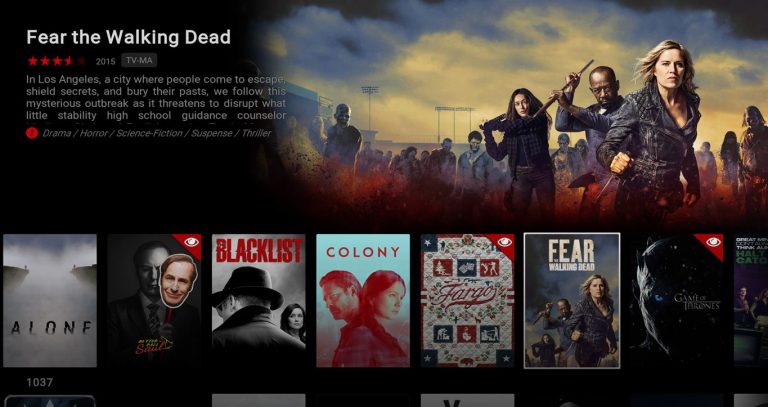
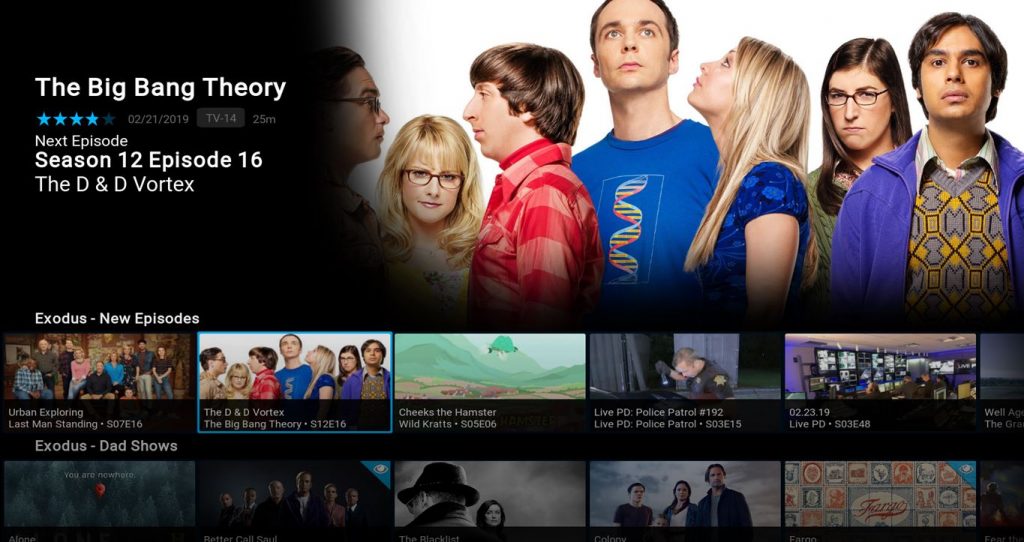
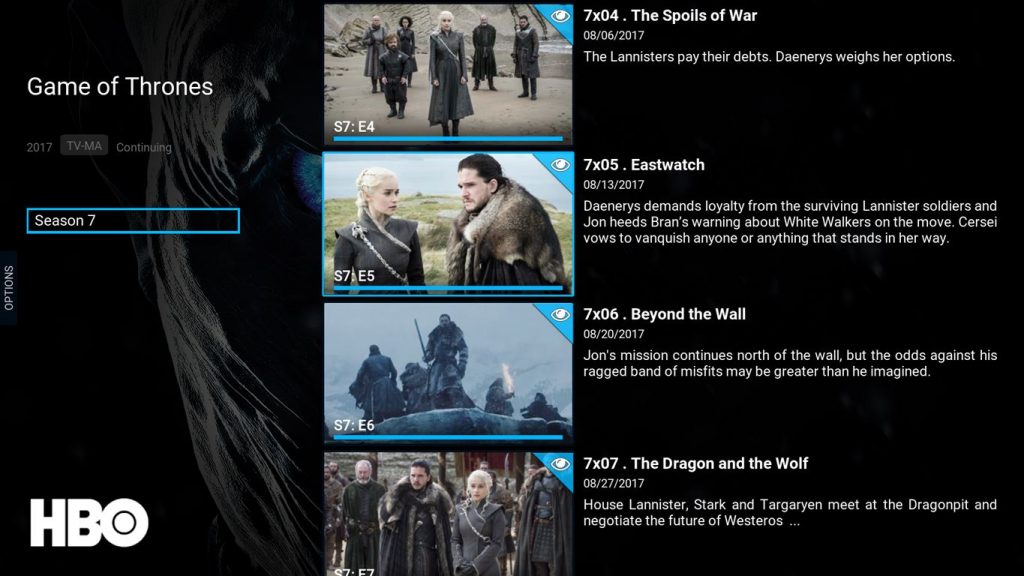
I posted earlier about the Aura skin, claiming that it brought the best Netflix experience to Kodi. While the Aura skin is a great skin, I now have to retract my claim because Titan Bingie Mode is so much better of a Netflix clone UI (user interface) for Kodi. It’s so good that people might not notice that it’s Kodi and not actually Netflix.
See How Much Titan Bingie Mode Looks Like Netflix
Here are some screenshots to show what it looks like…

How to the Install Titan Bingie Mode Kodi Skin
First things first, this skin only works with Kodi 18 Leia. If you are still using the older Kodi 17 Krypton, you will need to update Kodi in order to use this skin.
Now, without further ado…
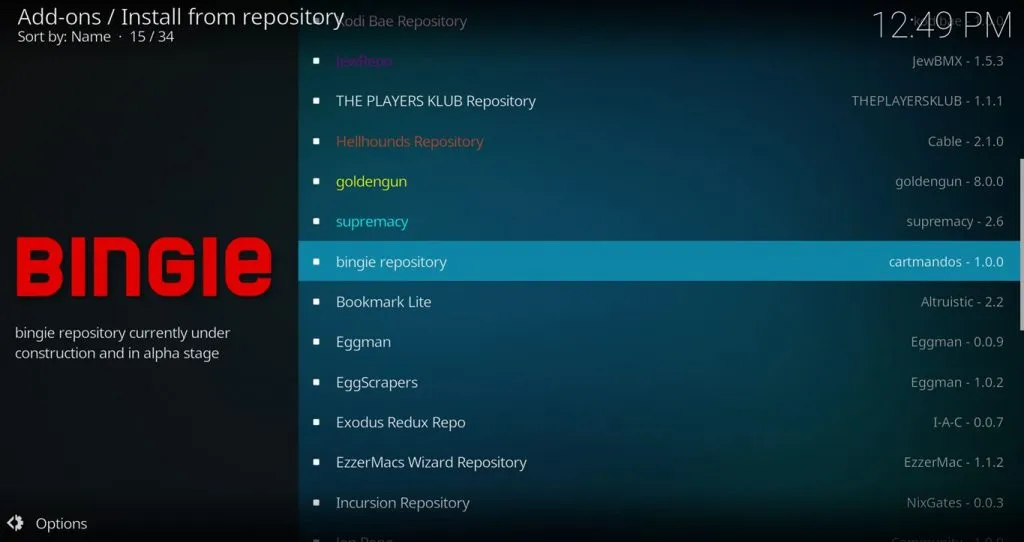
- Go to the Kodi settings

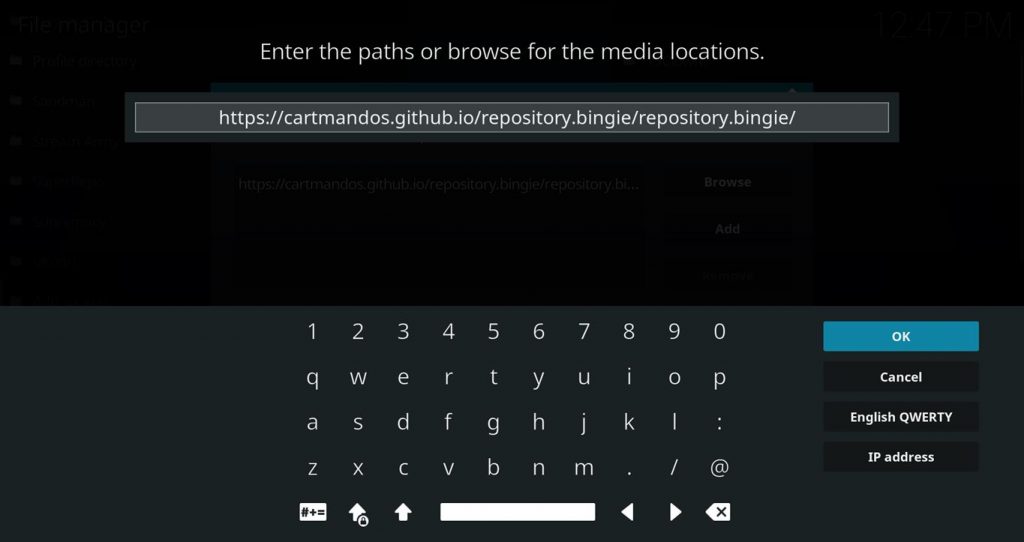
- Go to the File Manager

- Add a Source and enter the following URL exactly…
https://cartmandos.github.io/repository.bingie/repository.bingie/
- You can leave the name of the source as “repository.bingie”
- Now, go to Settings > Add-ons and select Install from zip file.

- Select repository.bingie

- Select repository.bingie-1.0.0.zip

- Go back to Settings > Add-ons and select Install from repository.

- Select bingie repository.
- Select Look and feel.

- Select Skin.

- Select Titan Bingie MODE for Kodi Leia.

- Select Install.

- Select OK on the popup of dependencies.

- Once it finishes installing, it will ask you if you want to switch to the new skin. Select Yes.
How to Configure Titan Bingie Mode Skin for the Best Experience
Right out of the box, this skin does not look very good with the default settings, but the good news is that you’ll have it configured and looking awesome in no time!
A tip before we get started… clicking the back button on your remote or backspace key on your keyboard while on the home screen will bring up this side panel so you can get to the settings.

Change the Homescreen Layout
- Go to Settings > Skin settings.

- Go to Homescreen layout > Homescreen layout.

- Change your homescreen layout to Netflix bingie MODE.

Configure Menu Widgets
Each row of the Netflix-style interface is a widget that is part of a menu item. This actual menu item shortcuts are only accessible from that slide-out side panel, but the homescreen layout displays the widgets that are associated with the menu items. You will need to set up each of those widgets to start filling in rows of content to browse through. The beauty of it is that you can configure these widgets to point deep inside of Kodi streaming add-ons like Exodus, etc.
- In the Skin Settings, go to Configure shortcuts > Edit menu shortcuts.

- With the first menu item highlighted on the left, move to the right and select Widgets.

- Here you can configure up to 8 widgets for each menu item. For example, if you followed my Ultimate Kodi Setup, you can configure one widget to show your Exodus – New Episodes from your Trakt Progress.

Note that you can change the layout of each widget to be Landscape vs Poster, and even Landscape Small.

Here’s what it looks like after switching that widget to Poster.

Forced Views
By default when you are browsing around through shows, seasons, and episodes, it will be using the default view which doesn’t look very good. First play around with the views using the side panel when viewing these things. Then, you can set your forced views for different types of content.
In the Skin Settings > Forced views, you can enable force views and then set TV Shows to Netflix, and set Seasons and Episodes to Wide Netflix.

Change the Color Theme
So far, all of these screenshots have been using the default blue color theme, but you can change it to the Netflix red, black, and gray colors called the Bingie MODE Color Theme.
- Go to Skin Settings > Color Themes.

- Select bingie MODE.

Now, your home screen should look something like this (with the red instead of blue).

Troubleshooting Issues With Titan Bingie Mode
If you get a failed to install a dependency error having to do with script.module.cherrypy, then try this.
Go back to and select: Add-on browser > Install from repository > Bingie Repository > Context Menus > Skin Helper Service > Install (or Update)
If the above method didn’t work, then you can install the Marcelveldt Repo manually.
To install the Marcelveldt Repo, download this file to your device, https://github.com/kodi-community-addons/repository.marcelveldt/raw/master/repository.marcelveldt/repository.marcelveldt-1.0.1.zip and then go to Settings > Add-ons > Install from zip file, and then browse to this file that you downloaded.
Fix Titan Bingie Mode Stuck on Black Screen
I had this happen on just one of my devices where I tested this skin. Later on, I got a comment from someone else who had the same thing.
If you find yourself in this situation where you have no way to get back in the settings, there is a little trick. If you hold the back button, a bottom slide-out menu should appear letting you select the setting cog to get back into the settings.
When I had this happen, I didn’t give up. I went back into the skin settings and played around with it for a little while until things worked properly. Specifically, check the optional add-ons you can install from the “Supported Addons” menu. Also, under “Configure shortcuts“, there is a “Reset menu items” link which might help as well.
Thoughts and Tips?
If you want more information about this skin, visit this official thread from the developer.
Let me know what you think of this skin. Leave a comment below.
Also, since there are a TON of settings in this skin, if you find any other tips to make this even better, please leave me a comment down below. Thanks!


Great tutorial. Fantastic job!
Thanks!
I added my trakt progress from exodus to this but they won’t play. Movies work fine. When I click on the episode and select play, there’s no source status showing. It just shows a loading spinner and then stops. Any idea how to fix this?
Does the issue only happen when using the home screen widget? Like, if you go to Exodus and go to the same Trakt Progress screen do they play there? If not, then it must be an issue with the Exodus settings or something. Go through my troubleshooting checklist here to see if you can fix the problem. https://kinkeadtech.com/kodi-streaming-issues/
Yes. It works from the exodus app directly and in other skins. I e switched to a different skin for now since I can’t get this one working. The issue is exists only for TV Shows. Movies play as expected.
Does the issue continue with the new theme as well?
Just got back to trying it. Still has issues with 1.0.3
Chris, did you just now get back to trying this when TVDB is undergoing maintenance?…
https://old.reddit.com/r/Addons4Kodi/comments/dwip1v/tvdb_is_undergoing_maintenance_expect_addon/
Great write-up, thank you! Couple questions though:
1) How does this look/work with music albums & music videos in your local library?
2) Can you integrate the Netflix add-on to mix with local media for this setup?
3) Does this skin utilize YouTube for trailers? Should I create a YouTube API key to properly access this function?
1) I’m not sure… I haven’t checked it with music. I’m sure it looks good.
2) Yes, you can create widgets with local media just like you could with streaming add-ons
3) Yes, it uses YouTube for trailers, but don’t think it requires an API.
Hey,
I’ve subbed to a server that provides Emby/Plex library. However, I couldn’t find the video source location (prompt) to load my media on bingie. Currently I’m using Embuary skin, but I wanna make the switch.
If you get into any directory listing screen and just keep hitting the link at the top that has 2 dots “..”, it will eventually take you to a screen that has a “Files” link. If you go into there, then you can click “Add videos…” to add another library video source. I hope that answers your question.
Thanks for the quick reply. It turns out it only supports Kodi for Emby not embycon. Anyways I let it sync my 13k+ library, but it was super laggy and un usable on my mi box. So I’ve uninstalled it, and started using Embuary again which is snappy. IDK maybe the experience would be much better on the shield which is more powerful.
Hi and thanks for the tutorial!
I also had the black screen issue, I was wondering about the “black button” to bring up the bottom menu? I’m using a standard keyboard. Also, which add-ons can be used to reset the GUI?
Thanks
Stephan
If using a standard keyboard, you can use the Backspace key as your back button.
To reset the GUI, you can use a file manager to browse to the userdata folder and delete or rename the guisettings.xml file.
https://kinkeadtech.com/location-of-kodi-xbmc-userdata-folder/
Hi,
Will this skin auto populate with IMDB ratings?
Yes
The skin is compatible with Kodi Matrix now.
Installed the Bingie 1.03, works great except Trakt. Same issue as someone asked back in April. Movies work in trakt but progress doesn’t… So next episode shows up but not in red like it should if its not out yet and if it is out you press to play and the ring shows up then dissappears. This is from the main home screen. The only way to use it is to open add on in my case Exodus redux. It will work from there. Has anyone found a solution. Just to note this does work with other skins. Trakt account is activated..