
In this tutorial, I’ll show you how to install Fusion on Kodi so that you can have quick and easy access to install whatever add-ons you want.
I’ve written a lot of Kodi tutorials that involve the installation of Fusion, but I’ve yet to write one dedicated to Fusion. So, let me take this opportunity to slow down and explain what exactly Fusion is and how to install it in as much detail as possible.
UPDATE: Fusion is shut down. Use an alternative.
But then, you can still use this tutorial to see in-depth instructions on how to install an alternative to Fusion.
What is Fusion?
Fusion is a collection of Kodi repositories maintained by the folks at TVADDONS. You can add Fusion to Kodi as a source in the Kodi File Manager.
Having this file source allows you to quickly install repositories that contain your favorite add-ons.
Here’s How to Install Fusion on Kodi
Go to the Kodi File Manager. If using Kodi 17 with the default Estuary skin, click on the settings icon…

Then click on “File manager”

If you’re using the Arctic Zephyr skin, press the down arrow when on the Settings main menu and it will open. Click on “File manager” there.

The old default Confluence skin has the same dropdown under settings or system.
Next, select “Add source”.

You’ll get a popup that looks something like this.

Select “<None>” and then type the address exactly like this…
http://fusion.tvaddons.ag
… and hit the OK button or press Enter on your keyboard to finish entering the source path and get back to that popup.
Next, click on the field labeled “Enter a name for this media source” and type in something for you to recognize what it is. I typed “Fusion”.

Now, click on the OK button and you’ve now successfully added Fusion to your Kodi File Manager.
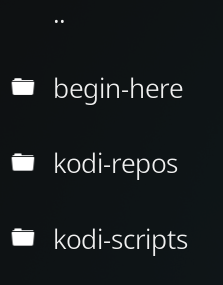
To test it, click on Fusion in your File Manager and you should see 3 folder, begin-here, kodi-repos, and kodi-scripts.
How to Install Repositories from Fusion
Now that you have Fusion, here’s how to install repositories from it.
You need to find your way to the Add-ons area where there is a link labeled “Install from zip file“.
In the old Confluence skin and other skins, this menu was much easier to find. Unfortunately, in Kodi 17’s Estuary skin, it’s a bit hidden.
In the Add-ons main menu…

Click on the “My add-ons” button at the top…

Now, the tricky part is here because you have to go up a folder by clicking on the 2 dots (..) at the top of the list…

If you get to another page that also has the 2 dots, click them again.
Eventually, you’ll get to this screen. Click on “Install from zip file”.

You should see “Fusion” in the list. Select that.

Select “kodi-repos”.

Select “english”.

Here, you’ll see a list of all of the repositories that Fusion has available for you to install.

Use Google to find out which repository has the add-on that you want to use. Select that repo to install it.
How to Install a Kodi Add-on from a Repository
Once you have a repository installed, installing an add-on from that repository is even easier.
Just get back to the screen with the “Install from zip file”, but this time select the option right next to that labeled “Install from repository”

On the next page, select the repository that has the add-on you want to install.
After that, you’ll see a listing categories. The most common add-on that you would want for streaming would be in the “Video add-ons” category, but it depends on what you’re trying to install.
Once you select the appropriate category, you should see a list of add-ons. Select the add-on you want, and it will open a screen that looks like this…

Click the Install button.
After you see the notification that the add-on has been successfully installed, you can click on it to go into that same screen and select “Run” to open it. Or, later you can go back to the add-ons main menu on the home screen and you should find it there.
Need Help?
Leave a comment below if you have any questions at all. I love to help if I can. Thank you!


[…] Add Fusion as a Source in Kodi’s File Manager […]
I cannot get fusion to install on my firestick.. I installed kodi on my firestick today, 17.3, but when I try to install fusion from the tvaddons.ag, it cannot find the file path. Any help would be greatly appreciated
Fusion is has been down for a couple weeks. Nobody knows if they are shut down for good, but a couple weeks is a long time for server maintenance or a migration. https://kinkeadtech.com/could-not-connect-to-repository/