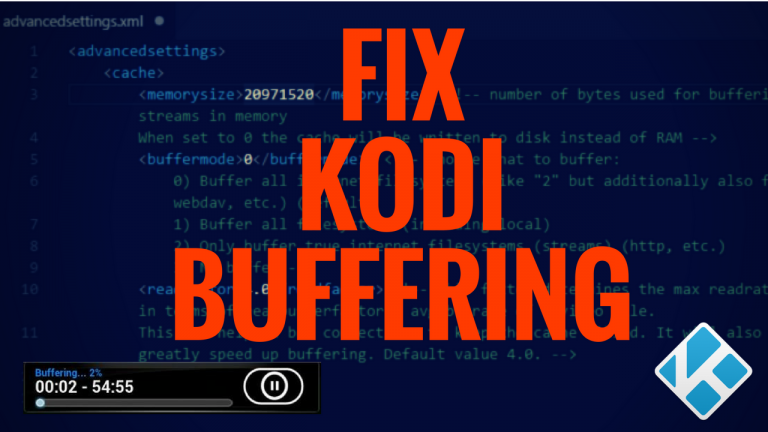
In this tutorial, I will show you how to adjust some hidden cache settings in Kodi to possibly help fix issues with buffering of your video streaming.
First of all, I need to preface this with a disclaimer. This solution may not help with your buffering issues if your Internet connection is too slow, or if the server you are streaming from is limited in bandwidth or reaching its traffic capacity. There are lots of other possible causes for streams buffering which I covered in my post on Troubleshooting Kodi Streaming Issues, but this is just one of those tips.
What these cache settings (which I’m about to show you) do is fine tune Kodi’s cache buffer behavior to work best with the resources available on your hardware whether it be a high-powered media server, or a little Amazon Fire Stick.
Alright, let’s get into it…
Cache Settings in advancedsettings.xml
These settings will go in the advancedsettings.xml file that should be in your Kodi userdata folder.
The screenshot below is for the manual install of Kodi on Windows. If you have the Windows 10 Store edition, click the above link for the path for that.
By default, this file will probably not exist, so you will need to create it.

If you have easy access to the file system like using Windows, or having a file manager on Android, then this should be pretty straightforward. If you’re using a Fire TV or Stick and can’t figure out how to access this folder to create a new file, scroll down for my instructions on pushing a file using ADBLink.
Now, edit this file in Notepad, Notepad++, or some other text/code editor (NOT Microsoft Word or Wordpad since those editors will add extra hidden code). In my case, I’m using my favorite code editor, Visual Studio Code.
If you’re not sure how to create this file and want to download mine, just right-click on the following link and then click “Save link as…”
Here’s my advancedsettings.xml file in .txt format
Then, you will need to rename the file to change the .txt to .xml and place it in your Kodi userdata folder for it to work. If you don’t see any .txt extension at the end of the file that you download, then you need to configure your computer to show file extensions (a.k.a turn off “Hide extensions for known file types”).
What Do These Kodi Cache Settings Do?
Don’t just copy the settings I’m using because this is NOT a “one size fits all” setting. You should adjust these to work best for your device’s available resources, specifically free RAM and hard drive storage.
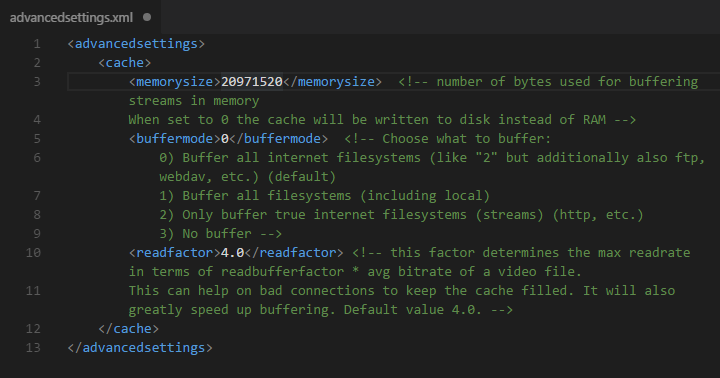
<memorysize>
This is number of bytes you want to allow Kodi to use for buffering your streams.
Now, please keep in mind that Kodi needs 3x the amount of RAM to be free. So, take a look at how much free memory or RAM you have available on your device, and divide that number by 3, and use that in the setting (converted to bytes).
Be careful not to set this too high, or you risk Kodi crashing if it can’t get enough RAM.
If you have a device with a very low amount of RAM like a Raspberry Pi and you have more than 16GB of storage, you might consider setting this to 0 (zero). What that will do is make Kodi use your hard drive or storage to cache videos instead of using your RAM.
Please be aware that using your hard drive for buffer caching will cause a lot of extra wear and tear. Hard drives have limited life before they start slowing down and becoming corrupt, and even SSDs (solid state drives) have a limit to the number of writes they can take in their lifetime.
<buffermode>
This setting defines what types of content should get buffered. You should consider if you have local storage collection of media that you watch (consider mode 1), or if you only stream videos using add-ons (consider mode 0 or 2).
- 0: Buffer all internet filesystems (like “2” but additionally also ftp, webdav, etc.) (default)
- 1: Buffer all filesystems, both internet and local
- 2: Only buffer true internet filesystems (streams) (http, etc.)
- 3: No buffer
<readfactor>
This is where you set the fill-rate of the cache. It defines how fast Kodi will try to read a video file.
It is a multiplier with a basis of 1 matching the bitrate of a video file. So, if a video file has a bitrate of 36 Mbps, then a readfactor setting of 1 will read the video at the exact pace that the video plays, at 36 Mbps. Setting the readfactor to 2 will try to read the video file twice as fast, at a rate to 72 Mbps which will result in the buffer filling up with 1 second of video for every second that you watch the video, until it fills up your limit define in .
With this setting, you don’t need to worry about crashing Kodi, so you can set it as high as you want. Just be aware of more CPU usage spikes and bandwidth being used up faster as you start a video.
Quick note on add-ons to manage advancedsettings.xml
There are some Kodi add-ons that have an interface to make these changes and write to this XML file for you, like the Easy Advanced Settings add-on in the tvaddons.ag repository.

However, according to the official Kodi Wiki, the names of the XML tags have been renamed in Kodi 17.
In Kodi v17, the following tags are removed from and placed under a new tag. Also, is renamed to and is renamed to
Unfortunately, the Easy Advanced Settings add-on still hasn’t updated to the newly renamed XML tags used in Kodi 17.
If you’re still using Kodi 16, then go ahead and use this add-on since it makes the process of changing these settings much easier.
Pushing advancedsettings.xml to a Fire TV / Stick using adbLink
If you have an Amazon Fire TV or Fire Stick, and can’t easily edit your advancedsettings.xml file, you can use adbLink to push the file from your computer to your Fire TV / Stick.
If you installed Kodi on your Fire TV / Stick using my tutorial, then you already have adbLink installed on your computer. If not, get it here. (Windows / Mac OS X 10.7+ / Linux)

Prepare Your Fire TV / Stick Before Using adbLink
- On your Fire TV Stick, navigate to Settings > System > Developer Options and turn ON both options (Apps from Unknown Sources and ADB Debugging).
- Find and take note of your Fire Stick’s IP address by going to Settings > System > About > Network.
Using adbLink to push advancedsettings.xml to Fire TV / Stick
- Open adbLink on your computer (which you downloaded and installed earlier)
- Click the New button
- In Description, give your Fire TV / Stick a name.
- In Address, type the IP address of your Fire TV / Stick that you took note of earlier.
- Click the Save button.
- Click the Connect button, and you should see your Fire TV / Stick’s IP show in the Connected Devices box.
- Under Preset directories, select userdata
- Click the Push button
- Browse to and select your advancedsettings.xml file that you prepared
- Confirm the prompt by clicking Yes
- You should get a popup saying “File Pushed.“
- Close and reopen Kodi on your Fire TV / Stick

Let’s Chat
Do you have any feedback for me? After you try it out, let me know if it worked for you. Was this helpful?
Or are you having issues? If so, please give me some specific details about the issue you’re having and I’ll see if I can help. Thanks!


[…] To find out how to modify these settings, check out out my tutorial How to Fix Kodi Buffering with Hidden Cache Settings. […]
[…] you should definitely take a look at Kodi’s Hidden Cache Settings to help with buffering […]
While watching TV or a movie Kodi shuts down. what would cause this
There’s not a whole lot of detail to this question, but I’ll take a shot and ask what version of Kodi are you running? You might also want to uninstall any unused add-ons which might be causing the issue. You can check the log and it might give you a hint as to what was causing a problem that led to Kodi crashing.
I can promise you no matter what version of Kodi you are using it’s still going to shut down. Here’s what you need to do. First go into your “my addons and go to repositories and uninstall any and all repositories your not using, they will be self explanatory once you get in there. Next you want to sign up for real-debrid account and believe me it’s very cheap (like $20 buck every six months) Make sure your using Kodi 16.3 or newer. (I’m using Krypton 17.6) there is a newer version of Kodi which is Kodi 18 but I’m not sure if it’s finalized or still in developer stage. That should take care of Kodi shutting down, if it’s not and it keeps doing it, go back and make sure you have google play store installed.
Michael Daniels, thank you for all of your very helpful comments today. High five!
This worked amazing. I am using an acer laptop and tested my internet before trying this and my speeds should have been sufficient. But my movies and tv shows would buffer and skip seconds and do many other annoying things. After following your guide I watched a 40minute episode fully load after 5minutes of runtime. And play the whole thing without one issue. Thankyou very much. I only sujest you explain further how to create xml documents. I had to download xml word and write the data then save it to my desktop and drag and drop the file into the proper folder as it cannot be searched for or found in the save window. Anyways thankyou very much this turned out better then expected
Thank you so much for letting me know how well it this worked for you. That makes me happy. Also, thank you for the suggestion on how to improve the post. I’ve updated the post to include some more details around the process of creating the file and even included a download link so someone can start with my template.
I have a Raspberry Pi 3, originally running Exodus, updated to Covenant, everything worked great for a while. Since November, having big issues with buffering, no stream available, stopping play in the middle of viewing. Now we are at the point of not being able to view any TV show. Any suggestions of how to reinstall KODI/Covenant or operating system – currently running OSMC. Tried Libre Elec – but we seem to be doing something wrong.
I’m also having these issues using the Fire Stick – lots of buffering, no stream available msg and stopping play in the middle of video. Any suggestions on correcting this issue will be greatly appreciated.
Did you try the fix in this post? Also, have you subscribed to Real-Debrid? That makes a huge difference.
Try using Neptune Rising app. Covenant out of date!
On a Raspberry Pi 2 Neptune Rising is tooooo slow going thru the menus. But thanks for the suggestion.
I’m not sure where I could possibly start. Regardless of hardware, I would just say make sure you’re running the latest Kodi 17 and then use an add-on like Covenant that is still operational using my installation tutorial.
Using Kodi on elitedesk PC running win 10 with i7 CPU with 4 gig ram. Usually sources don’t play continuous so I tend to pause and let it build up. Thing is even with cache ramped up to 1gig a hour episode will only ever fill up about 75% ? Is there some setting that limits amount of buffering saved apart from cache size?
Always stops building up about 3/4 through but if I jump forward to where it stops it starts filling up again to the end? If I click back to the start I lose all the buffer I had?
Ya, skipping around in Kodi isn’t handled very well. Instead of going to that part of your cached video, I’ve seen that it often wipes the cache and starts downloading from there. About the 75%… I’m not sure, but there might be a max limit. But, it sounds like you’re not having any trouble watching videos if you can get 75% cached up front.
I’m wondering if there is a way to add advanced settings xml scripting to force KODI on my Fire Stick to send buffering cache to my connected SD memory card; by default. I wouldnt mind letting my streaming content selection load for 5 or so minutes to stream from my cache off the SD card that I’ve connected via the mini USB port with a splitter.
I thought I responded to this, but I’m not seeing it. Maybe it was just in my head? LOL
I’m not aware of any way to change the memory location to an external source using the advancedsettings file. But, if you find a way, I would love to know how.
I followed your instructions adding the addvancedsettings.xml on my laptop and it works GREAT! Now I want to do the same on my TV box. I’m not able to find the correct folder to insert the file in using the file browser. Any suggestions?
It might be a hidden folder. Some file managers have a setting to show hidden files and folders.
Thanks, I’ll check it out. Maybe get another file manager if needed
If using Android, my favorite is ES File Explorer.
Actually I found the addon “Easy Advanced Settings” for Kodi 17 Krypton” and it worked great. You could pass this on to other Android users.
I took note of this for future post updates. Thanks.
I’m trying to solve the issue with playing large files over WiFi router (>6GB).
My TV box has 4GB RAM (X96MAX). Tried to set the to 536870912. I’m OK to wait for awhile couple of times when watching, but not every 1-5 minutes.
to 1 and to 1.0, but the buffering still appears every 1 minute or so. Experimenting with memory size (128mb-256mb) and buffermode haven’t helped so far.
Placed the advancedsettings.xml file in Android/data/org.xbmc.kodi/files/.kodi/userdata/ folder as instructed.
Kodi version installed: 18.2 (32-bit downloaded from the web-site).
How to make sure the Kodi player is using this file at all?
I see the comment box has eaten parameter names:
memorysize: 536870912 (also tried 128mb-256mb)
buffermode: 1 (also tried 0)
readfactor: 1.0
6 GB is pretty big… it may simple come down to the fact that you can’t download/stream the file as fast as you watch it. You might want to try wired ethernet if that’s an option, and you should also consider increasing your internet speed if it might be too slow. But, even with those, the source server might still not have enough available bandwidth to stream to you that fast. Are you using Real-Debrid or Premiumizer? Those will give you faster bandwidth from the server’s side.
Thanks for the reply, Nathan!
The file to be played is located on Windows PC shared on the same network over home WiFi connection.
Wired ethernet is not an option, unfortunately. The bottleneck here is the local WiFi transfer speed (from PC to WiFi router and from router to TV box).
The question is if there is a way to pre-buffer large chunk of the file to be played using the RAM available on TV box side using native KODI.
I’ve not tried third-party solutions you listed as I’m not sure they could help. Will try them now.
Oh, I see. You’re streaming the video over your LAN. Then, yes, the wifi bandwidth might be limiting you. I would make sure you have an 802.11AC wifi access point (or router) and have it configured to use 5 GHz. You will have also make sure that both devices support AC and 5 GHz.
I had an Android TV with on wifi i had the same problem when playing files from my nas. My solution? Got a wifi repeater and then connected the tv via ethernet to the repeater.
I have an Android tv box 5.1 ms8 pro with basic ram/rom , it’s nearly. Enough. Actually i don’t think it’s enough. I am trying to play 4K movies and mostly it will not play. It will freeze but I do get to see a movie off and on. I got an error message that my READ RATE was too low. I have made adjustments everywhere but want your input to maybe resolve this issue once and for all. What about a new box with m3/4 ram and 32 rom would that help? Thank you. , JJ
Read rate too slow usually is caused by the server you’re streaming from doesn’t have enough bandwidth to give you. Are you using Real-Debrid or Premiumize? If not, then getting one of those will solve 90+% of your problems.
Regarding the hardware, I wouldn’t worry about that until after you’re using a debrid service like those. But, just so you know, RAM, CPU, and GPU would be the primary things that affect streaming performance. ROM is just storage space which shouldn’t be an issue for streaming.
In your article you say: “If you have a device with a very low amount of RAM like a Raspberry Pi and you have more than 16GB of storage, you might consider setting this to 0 (zero). What that will do is make Kodi use your hard drive or storage to cache videos instead of using your RAM.”
For a Raspberry Pi with a flash-based SD card in the slot, this is a bad idea, as it will eventually kill the SD card through memory wear. If the Pi has another form of storage (eg. spinning disk), this may work OK, however Kodi doesn’t seem to have a setting in advancedsettings.xml that directs it to cache in a particular location.
That’s something to consider for sure. Thanks for sharing. However, with how cheap a Raspberry Pi is, the option I mentioned would still make sense as you would still get a decent amount of life out of the device with a better experience (if you were suffering from buffer issues)
Hi Nathan,
Kinda not the point… I have a ~20 RsPis installed in shopping centres. Some are installed in relatively inaccessible places (eg. 5m above an open area and attached to a walkway).
They play back media stored on a central NFS share. I have an SLA in place with clients.
I don’t want to have memory wear causing SD card failures and needing replacement. I would be in breach of SLA if that happened too often, as well as expensive (hiring scaffolding and arranging after hours access to change devices and SD cards is not at all cheap).
The inexpensive nature of an RsPi doesn’t enter into it in our use case.
Good points. Fair enough. It sounds like you have a very different use case than most.